Upgrade from Angular 11 to Angular 18 🚀
Upgrade like a Pro to Angular 18
TECHNICAL
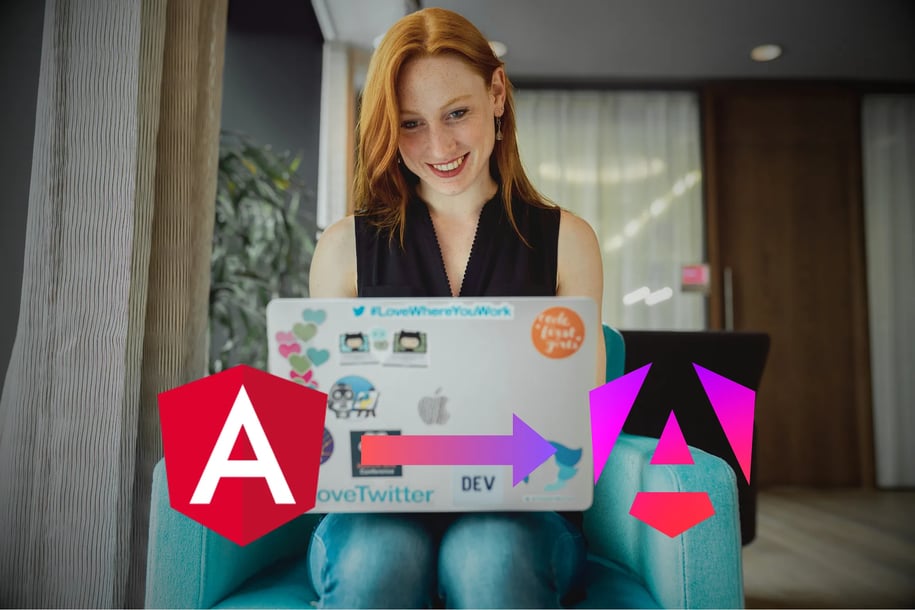
Photo by ThisisEnginerring on Unsplash
Ever felt stuck with an old, sluggish Angular app, desperately wanting to migrate it but overwhelmed by the challenges? Let’s face it — we’ve all been there, watching modern web advancements pass us by while we’re stuck adding features to outdated frameworks. It’s frustrating, isn’t it?
I’ve faced that struggle, conquered it, and now I’m here to help you do the same. Together, we’ll turn that pain into progress.a
Let’s dive in and make migration a reality!
Why migration is important?
Softwares are like skills; regular updates are necessary to stay compatible with the future.
The Angular team follows a six-month release policy, with a major release every six months. All major releases are typically supported for 18 months; 6 months of active support followed by 12 months of LTS support. With this policy, each version will go to inactive support every 1.5 years!
As of writing this article, the Angular team no longer supports versions v2 to v16.
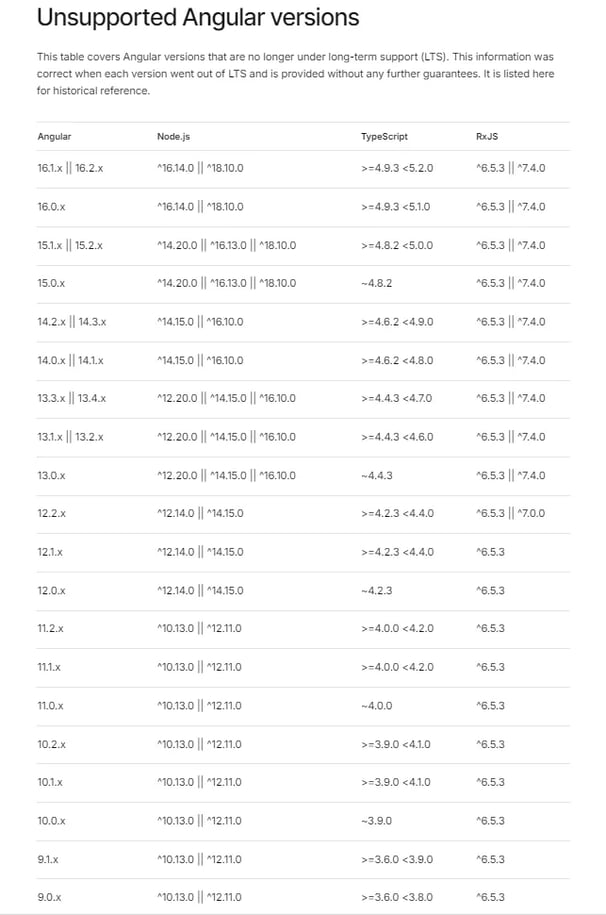
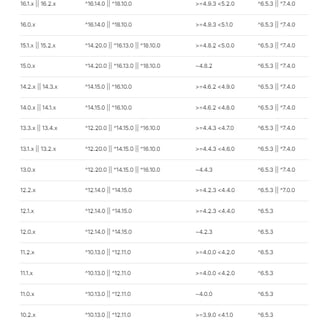
List of unsupported Angular version after v9
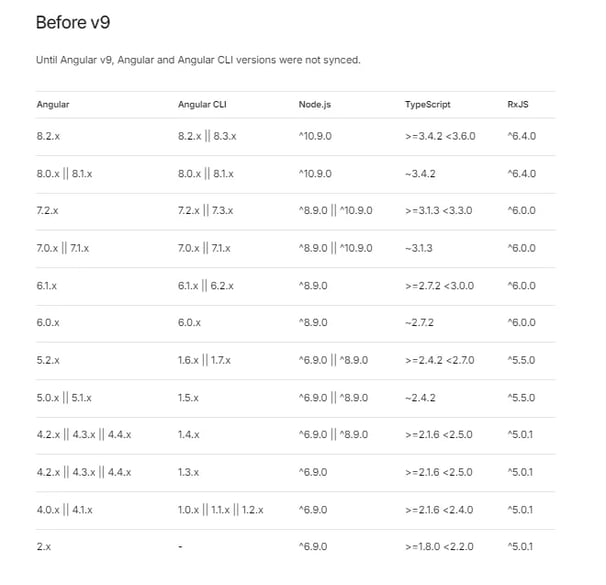
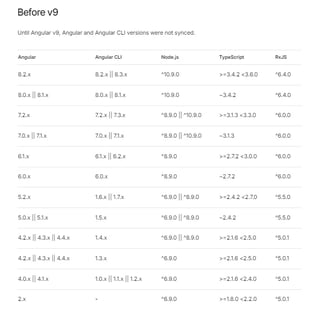
List of unsupported Angular version before v9
This means that the issues of these unsupported versions will never be a priority, and the individual developer might have to invest a lot of time in overcoming the challenges himself.
Considering the above scenario, we should be on our toes to keep up with this pace!
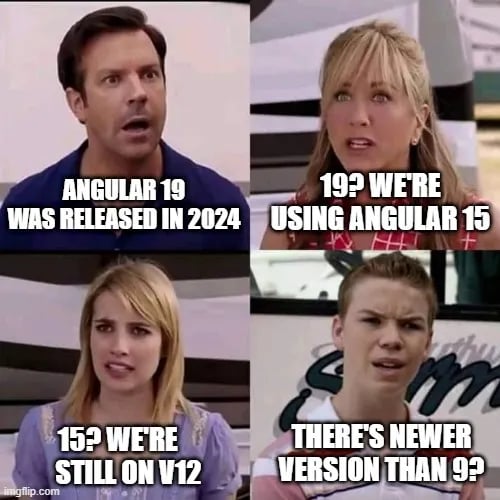
Angular developers in some discussion 👀
Why is migration hard?
Undergoing migration is never easy.
First and the foremost challenge is to get APPROVALS!! (pun intended)


Before you even start the migration, you need to fight your battles with your Team Lead, Manager, Architect and Product Owner to convince them for approval and I promise the struggle is challenging. I had to win my battle and convince the PO for approval.
Such senior personnel (not every one of them) are less concerned about the architectural changes and more inclined towards visible features. As features are quantifiable. Architectural improvements though not very visible but are important in the long run. You need to convey this message in your speech to higher authority!
Second battle is the real migration. The Angular team makes sure that each new version is backwards compatible, but this is not the case with other libraries. Once you start looking for migrating other third-party dependencies in your project, you are often disappointed by the fact that either:
Many of the packages are now in deprecated status and you need to find a replacement package or create one that suits your specific needs.
If the package exists and supports the newer Angular version, then the package might have introduced breaking changes which you need to incorporate in your project for it to work. At times, these breaking changes introduce issues in the code that require attention
Before considering app migration, spend some time assessing your third-party libs. Once you have identified the alternatives and approach for them then you can propose the migration.
The above points often result in increased timelines for the migration task which again will be questioned by senior personnel. These two challenges are why most businesses avoid migration, as it costs them both time and money with (apparently) no visible changes to the app. Gradually, the app’s code becomes legacy code!
Working on a legacy project often feels like steering a sinking ship.


You cannot use the new features that technological advancements provide.
It further limits your practical experience of such features and their benefits.
The development time also increases as the dev team is either busy re-inventing the wheel or fixing framework/third-party library issues that are already fixed in later versions.
This leads to increased technical debt as the team remains bound by outdated conventions.


I’m limited by the technology of my time
How to migrate?
With the challenges identified and solutions in hand, we can now plan our migration.
The following are the approaches to migration:
Microfrontend
The Microfrontend (MFE) approach involves implementing the new features on the updated version while integrating them with the existing Angular version within an MFE architecture. Eventually, all the features will then transition to the new framework.
Microfrontend approach of migration
The challenge with this approach is that Module Federation was officially supported in Webpack v5 which got support in Angular v12. Many enterprise applications are still using Angular versions older than 12. So this option is limited. Besides, it has other configuration overheads such as configuring domains for your microfrontend apps, sharing stores between your host and shell apps, syncing old and new code, configuring library versions between the monolith and microfrontend etc.
Complete rewrite
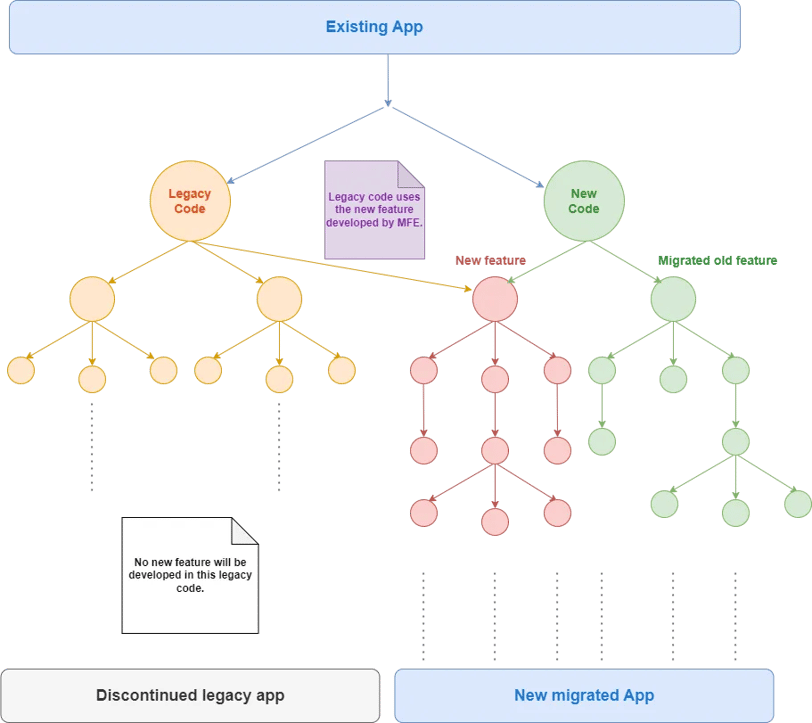
Another approach is to create a new repo with the newer Angular version and gradually develop all the features here. Once this new code has all the fundamental functionalities built (such as authentication, authorization, etc.) that can support other features, new features will then be developed here and not in the old repo. The legacy system remains operational until fully replaced. I had the opportunity to be part of a migration team in one of my past roles where we migrated a banking application using this approach.
Complete rewrite on new framework
This option has its challenges of syncing the new feature release timelines with the migrated features as there will be two teams involved — the feature team and the migration team. Both teams need to be in proper sync to ascertain timely delivery. This is the most recommended option given that the stakeholders approve it, since it requires a lot of effort on the part of management.a
Bing Bang rewrite
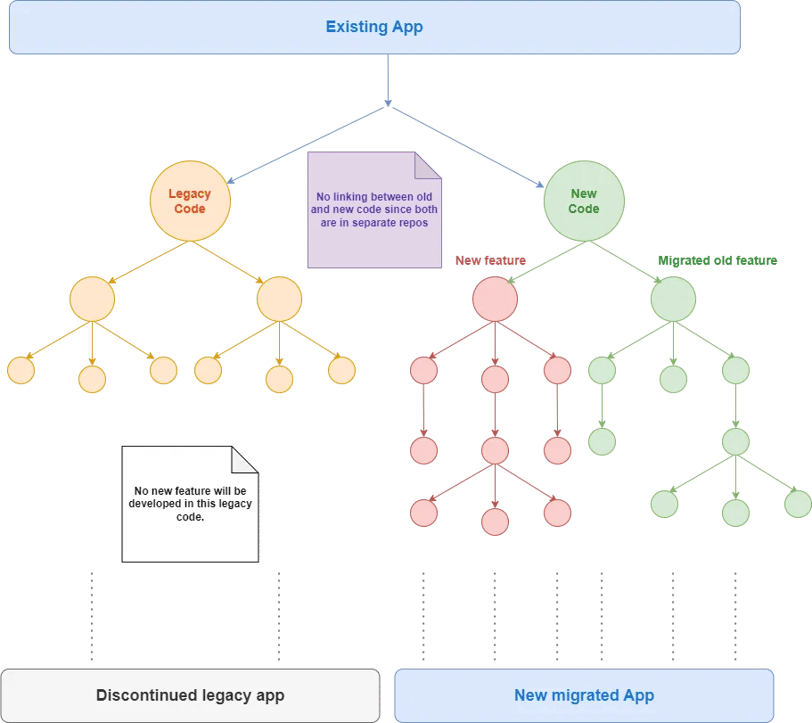
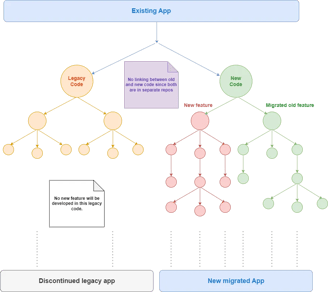
The infamous approach of migration is where the main repo is migrated directly, migrating features on the new framework. Once done, the changes are merged into the legacy code bringing the entire codebase to the newer framework.
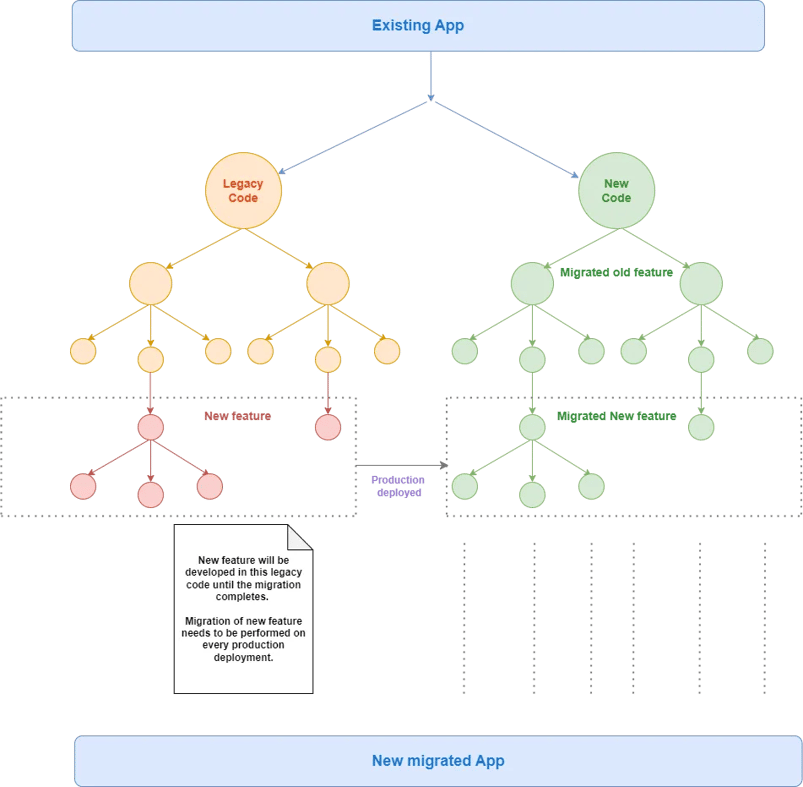
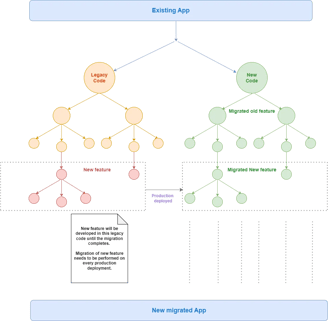
Like other ways, this too has its shortfalls. The major challenge is to keep migrating the features developed in the legacy systems as soon as they are deployed on production.
In other ways, the changes are done in parallel pipelines instead of the main pipeline which reduces the friction in integration between legacy, new and migrated code.
You can choose any of the above migration methods based on your needs.
For my enterprise application, the Angular version was v11, a fairly older version introduced in 2020. While the first two approaches are highly recommended, I had to opt for the third due to an outdated Angular version and a shortage of developers and time for the migration.
Now that everything is in place, let the migration begin!
Big Bang rewrite
Angular Framework Migration


Photo by ThisisEngineering on Unsplash
As recommended by the official Angular Update guide, the migration should be incremental, one version at a time. You should follow this guide by filling out your current version for upgrade. This guide mostly takes care of changes that are required on the part of Angular framework migration.
For Angular version > v11 & <= v15
Till Angular 15, I haven’t faced any issues or breaking changes in migrating Angular.
One change that was introduced in v14.2 was the new routing APIs for standalone to better support standalone components and enhance tree-shaking for reduced bundle size without the need to import RouterMoule. Function-based routing syntax reduced boilerplate code and promoted extendability. To support the new router API, class-based routing guards were deprecated in v15.
For Angular version > v15 & <= v17
During migration to v16, the migration command removes the class-based routing guards and tries to migrate them to functions implying that the class-based guards needed to be migrated to function guards which is not the case.
You should only change the routing guard code to function-based syntax if you plan to migrate to v16 or v17. Migrating to the new routing APIs also requires migrating your app to the standalone architecture. You can refer to the migration guide for standalone components.
I simply reverted the function-based guards introduced by the migration tool since I had to migrate to a higher version without switching completely to standalone architecture (currently, we’re using standalone only for new components 🙂)
For Angular version > v17
The class guards were again re-introduced in v18 as many developers found them useful and its implementation along with function guards was a valid use case.
The Angular team realized that the function-based guards should be used at the sole discretion of the project team and should not be forced despite the benefits they provide. This is similar to the other new features such as the inject() method or the new control flow syntax.
Angular Material Migration


Photo by Jess Bailey on Unsplash
For Angular version > v15
In v15, Angular introduced Material Design Components (MDC), which became the most challenging part of the migration due to the breaking changes in this version.
In MDC components, the internal implementation of most components — including HTML structure, class names, etc. has changed. This shouldn’t be a problem if you have adhered to the public component API. However, many codebases often use global CSS or ::ng-deep to override Material styles, so you should expect these overrides to break.
For backward compatibility, the Angular Material team introduced MatLegacy<Component>Module. By default, the ng update @angular/material@15 command will do this legacy migration for you. Basically, in this migration, Angular falls back to v14 components with the existing styles and structure.
Angular has provided support for legacy components till v17. From v17, the legacy material components will not be part of the Angular Material package. However, you can still upgrade to Angular v17 and use the v16 Angular Material package. This will be supported till v18, after which Angular Material v16 will no longer be compatible with newer versions of Angular. You must migrate to Angular MDC components as soon as you can.
Angular Material has provided a brief guide for migrating to MDC-based components. You can keep this guide handy to refer to it during component migration. Once you run the command ng generate @angular/material:mdc-migration, it will ask whether to migrate on a component basis (it will only migrate those legacy material components that you select) or migrate all the components in one go.
After the successful run of the command, you can see multiple material classes being renamed by the tool. At some places, where the tool is not able to decide it will add a TODO
// TODO(mdc-migration): …
I called the guide brief as it doesn’t cover the changes required for theming your MDC components to work properly. Angular Material has made breaking changes to its typography and theming palettes. Without these changes, MDC components won’t render properly. Let’s discuss each one by one.
Typography levels:
The first change you’ll see is in typography levels. As per your existing typography, you need to change them with the corresponding new typography.
For Angular version >= v11 & < v15
Older Angular Typography for version ≥ v11 & < v15
For Angular version >= v15
New Angular Typography for version ≥ v15
Typography styles
Let’s now look at the typographic styles based on the above typographies.
For Angular version <= v11
For Angular version > v11 & < v15
For Angular version >= v15 & < v18
For Angular version >= v18
Angular 18 added support to the M3 MDC, for the M2 component we need to use m2- prefix with functions.
Density
Angular Material’s density value determines the spacing within components, such as how much padding is used around a button’s text or the height of form fields.
The density value accepts integers from 0 to -5, where 0 is the default spacing and -5 is the most dense and compact layout. Each whole number step down (-1, -2, etc.) reduces the affected sizes by 4px, down to the minimum size necessary for a component to render itself coherently.
MDC components were designed with accessibility and a mobile-first approach in mind. After migration, you will notice all the bigger icons, buttons & form fields which make better touch target areas. This likely breaks the alignment of components in your pages. The solution recommended is density.
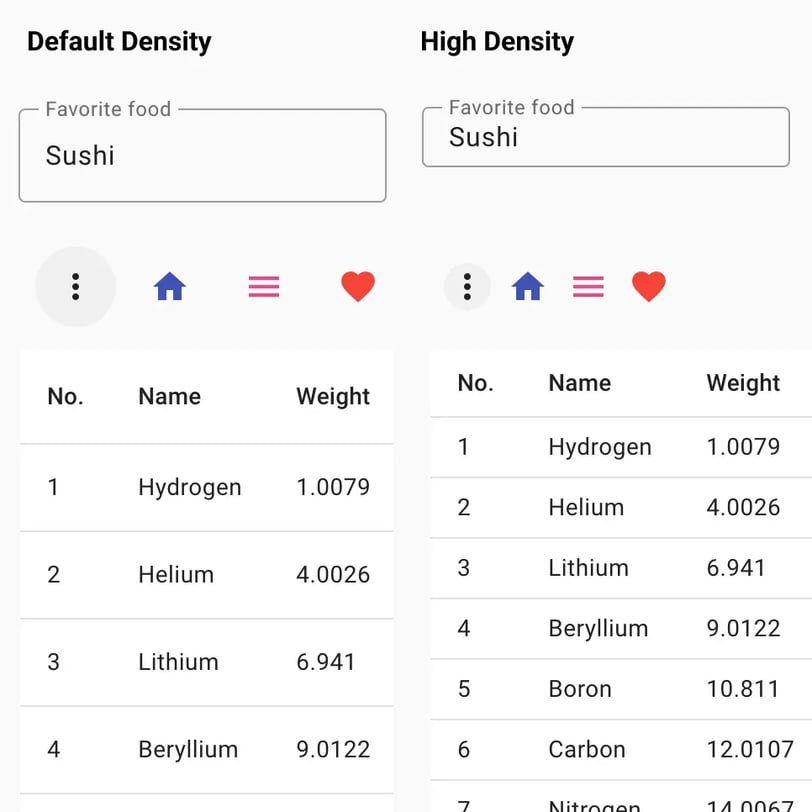
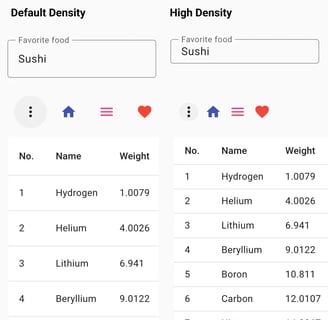
Density comparison
Your app pages may require different page densities depending on their layout. You can achieve this by applying density to specific components using Sass mixins.
There are limitations, however. The documentation is currently sparse, so you may need to refer to examples or source code to identify the appropriate Sass mixins to use. Additionally, there is no documentation specifying which components support particular settings. All components support densities down to -3, but some also support -4 and -5.
As per official docs:
Setting the density below 0 can reduce accessibility and make navigation harder for users of assistive technology.
Density customizations do not affect components that appear in task-based or pop-up contexts, such as the date picker. The Material Design density guidance explicitly discourages changes to density for such interactions because they don’t compete for space in the application’s layout.
Custom Class Override
After the above framework recommended changes, it’s time to modify our CSS overrides. Since the MDC components include CSS class name changes for their default classes, we need to update our class overrides to ensure our styles work correctly.
MDC components include -mdc in their class names, the migration tool updates these class names for you. However, for child elements, you need to make these changes as the nested HTML structure has been majorly rewritten for multiple components.
We should segregate styles for each component into separate files and import them into our global styles.scss. For example, all the MDC component styles related to the MDC button component should be placed in the file name mat-button.scss. Similarly, mat-form-field.scss, mat-chip.scss, etc.
This approach helps you to cover the styling changes on a component level resulting in faster migration of styles. So if you are done changing the button styles, the button will render properly for the entire application.
In the end, you will have multiple files at the global level which can be shared across applications. For my enterprise project, we have 2 apps — Admin and Client panel. Once the Client panel’s MDC migration was completed, I reused the styles in the Admin panel, reducing the effort by 80%!
Third-party Library Migration


Photo by Thomas Jensen on Unsplash
As discussed earlier, third-party libraries require significant attention. I cannot emphasize enough how crucial this aspect is in app migration. In this section, I will share my experience with third-party libraries during project migration.
While this section is subjective, as every project has different dependencies, I decided to include it due to its importance.
@angular/flex-layout to Tailwind CSS
The Angular team created this package in v5 to support Flex layouts. Back then, it proved to create a consistent browser-independent layout. As the time passed and the web matured, the need for this experimental package reduced. As a result, it was deprecated in Angular v15 as the Angular team decided to stop maintaining this in support of Modern CSS layouts.
In my project, this package was replaced with Tailwind CSS v3. Using Tailwind was a thoughtful approach as it offers:
Purgeable CSS — The final app bundle only includes the CSS that is used
Framework Agnostic — Independent of any framework, it provides a framework-agnostic solution for developing features. No matter the version of Angular, it will always work
ngx-swiper-wrapper to Swiper
It is an Angular wrapper around the Swiper JS library. This package was last published four years ago and is deprecated. We replaced it with the main Swiper library.
The ngx-swiper-wrapper package used an older version of the Swiper JS library. The library now uses Shadow DOM to better align with current web standards, which caused many breaking issues. In our project, the swiper was used at several places, so I took a directive approach. The directive was used to carry out the following tasks:
Initialize the Swiper library with configurations such as direction, slidesPerView, etc. provided by the parent
Register listeners on Swiper events activeIndexChange, reachBeginning, reachEnd
We used custom icons for the Swiper arrow buttons due to which I have to hide the default buttons. The default buttons used an SVG element for showing the icons while we used pseudo-elements to add custom images (::after & ::before for setting the content, ::part for setting the image for next and previous buttons).
A minimal code sample for the swiper directive will look like:
Moment.js to Day.js
Moment.js is a popular library found almost in every project that lived for more than 3 years. However, the project status recommends using other libraries as the Moment library was created for a different era of the web.
Following were the issues with using Moment.js:
It’s not tree-shakeable, and it has a huge bundle size if locales are used.
It’s a mutable library which leads to multiple bugs and long debugging sessions
Day.js, on the other hand, is a lightweight (2 kB size), simple (Moment.js-compatible APIs), Immutable (every operation returns a new dayjs instance that prevents bugs) and tree-shakeable library (only includes the used methods and locales in the final bundle).
I’ve used Day.js lib twice and it works like a charm! I highly recommend you give it a try.
@angular/material-moment-adapter to NativeAdapter
Most of us who use the Angular Material package’s date picker component use this package knowingly or unknowingly. An adapter is used to parse and format the dates provided by the date picker component. Material Moment adapter is widely used across as it is based on Moment.js.
As in the previous section we got rid of Moment.js, which implies that we should also get rid of the material moment adapter as it has moment.js as its peer dependency. Only then we can free our app completely of Moment.js.
For my project, we weren’t using any specific locale so I decided to use native Javascript dates in my custom adapter for parsing and extended it with NativeDateAdapter.
The basic adapter code will look like the following, you can override other functions provided by the NativeDateAdapter as per your need:
You need to provide this in the global providers in your app.module.ts:
providers: [
{
provide: DateAdapter,
useClass: DayjsDateAdapter
},
]
With this, we completely got rid of Moment.js! 🎉
lodash to lodash-es
Lodash again is a non-tree-shakeable library causing bloating of bundle size. We replaced it with lodash-es, an ES6-based library, which exports lodash library as ES modules.
The only change required was in the import statement, from lodash to lodash-es.
@ngrx/store
The state management library has a good migration guide document for each version. You can check the official doc for v18.
RxJS
Final thoughts
We’ve reached the end of this article. I have tried to share with you my practical experience with migrating an enterprise application in Angular. Every project has a different set of challenges and complexities, and there’s no “one-solution-fits-all” in the real world.
My learnings with this migration were:
We should keep migrating our projects’ tech to the LTS version regularly to avoid complexities in migration. Furthermore, it helps to reduce the tech debt within the team as everyone will get a chance to learn and work on new changes the framework introduces
We should aim to prevent tight coupling by implementing independent packages.
For instance:
1. We replaced the flex-layout package with Tailwind CSS, which works seamlessly regardless of the Angular version.
2. Replaced Moment.js with day.js, and Moment Adapter with our custom native date adapter.
In the future, this approach reduces the likelihood of version conflicts between these packages. Moreover, they can be migrated individually without impacting the entire project.
See you in the next one, cheers!
If you enjoyed this article, here are a few others you might enjoy —